4. Installation procedure for Windows
These are the installation instructions for BSCW 7.4 on Windows 10, Server 2016/2019 machines. If you are upgrading an existing BSCW server instance please go through section 2.4 Upgrading to BSCW 7.4.4
4.1. System requirements
For approximately 200 users BSCW requires the following server hardware on a Windows 10, Server 2016/2019 installation:
Intel Core/Xeon or AMD EPYC/Opteron (>3,5 GHz) 64-bit server system with at least 6 cores (or comparable systems of other manufacturers)..
16 GB RAM
At least 500 GB hard disk space (the BSCW installation requires about 200 MB disk space)
Windows 10, Server 2016/2019 with
Apache HTTP Server 2.4 or
Microsoft Internet Information Server (IIS 8/9/10)
To use BSCW you will need the “Python” interpreter software and extensions:
a Python 3.6, 3.7, 3.8 or 3.9 interpreter
pywin32Build 227 (Win32 Extensions and API for Python)Node.js(v16 LTS) an event driven JavaScript runtimePython
Jinja2template engineextensions for Python (optional)
pylucene- required for full text indexing support (packagePyLucIndex)ldap3- required for LDAP/Active Directory bindings (packageldap)
(optional) converter software for the BSCW preview feature, see Software for BSCW Preview for details
The “Python” interpreter, the “Win32 Extensions and API for Python”
(pywin32) and the Python Jinja2 templating engine are
copyrighted, but freely usable and can be downloaded from:
https://www.python.org/
https://github.com/mhammond/pywin32/releases/
http://jinja.pocoo.org/
The “Node.js” LTS version can be downloaded from:
https://nodejs.org/en/download/
Additionally you require a Web server. BSCW supports
Apache HTTP Server 2.4
Microsoft Internet Information Server (IIS 8/9/10)
To use the BSCW WebDAV functionality, you must use the Apache HTTP server. The Apache HTTP server is copyrighted, but is freely usable and can be downloaded from the Apache HTTP server project (http://httpd.apache.org). Windows binary distributions are available at http://www.apachehaus.com/ or http://www.apachelounge.com/
To enable the real-time conferencing via webcam and/or microphone a Jitsi
service must be available, see the COMMUNICATION_SERVER directive in the instance configuration file
<bscw-runtime-path>\conf\config.py.
In order to send registration and report emails BSCW finally needs access (via SMTP) to a mail server (Unix or Windows based).
Note
BSCW requires at least Python for Windows Extensions Build 219. Please upgrade older
pywin32versions before running the BSCW installer bscw-7.4.4-<rev>-py3?.exeWhen installing
pywin32as awheelpackage (using pip3 install pywin32) additionally the following command must be run from an elevated command prompt:python C:\Program Files (x86)\Python3?-32\Scripts\pywin32_postinstall.py -install
Before installing BSCW first install the desired Python extension packages (see above).
If the installer fails with an error message like
IOError: [Errno 13] Permission denied: 'C:\BSCW\srv\<runtime>\conf\config.py'
please disable your virus scanner before running the BSCW installer bscw-7.4.4-<rev>-py3?.exe
BSCW requires the use of a NTFS (local directory).
After installing the Apache HTTP server it might be necessary to add an incoming firewall rule to your Windows Firewall for port 80 or 443.
4.2. Installation and Configuration
Before installing BSCW ensure the Web server, the Node.js runtime, the Python 3 interpreter, Python for Windows Extensions (pywin32), the Python “Jinja2” template engine and the desired Python 3 extension packages or converter software is installed.
Note
The Python 3 interpreter must be installed for all users in a system “program files” directory. Additionally the install directory must be appended to the system PATH. To achieve this enable the following installer options:
[x] Install launcher for all users (recommended)
[x] Add Python 3.? to PATH
The easiest way to install “Nodes.js” is using the 64-bit Windows Installer (.msi) of the LTS (v16) version from:
https://nodejs.org/en/download/
Remind after the installation of the BSCW software to enable the BSCW event service in the instance configuration file
<bscw-runtime-path>\conf\config.py, see Node.js event server configuration.When installing pywin32 as a wheel package (using pip3) additionally the following command must be run from an elevated command prompt:
> python C:\Program Files (x86)\Python3?-32\Scripts\pywin32_postinstall.py -install
The Python “Jinja2” template engine can be installed using the Python packet manager pip3. Open a Windows command prompt with administrator privileges and run:
> pip3 install jinja2
If you want to deploy BSCW with IIS the CGI support must be manually enabled before the BSCW installer is started, otherwise the automatic configuration of IIS may fail.
The name of the download installer contains BSCW and Python version numbers – e.g. bscw-7.4.4-<rev>-py3?.exe contains BSCW version 7.4.4 for Python 3.?. Please make sure to install the latest version of BSCW and always provide your version number when contacting support staff.
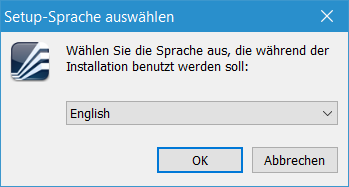
Start the BSCW setup procedure by double-clicking the installer (according to your Python version)
bscw-7.4.4-<rev>-py3?.exe
The BSCW installer first asks for the language used in the current setup procedure. Select the desired language and press .
Then the setup program will try to install the BSCW version 7.4.4. Click and accept the license agreement
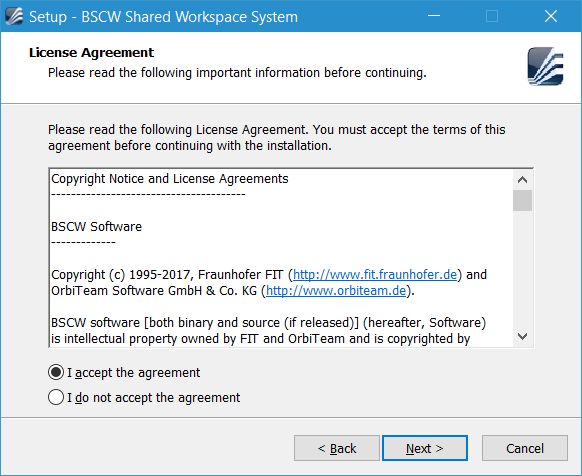
and continue with . Read the HTTP server hints
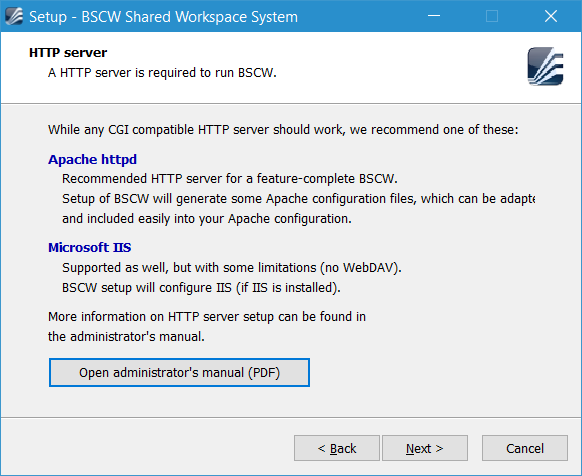
and continue with .
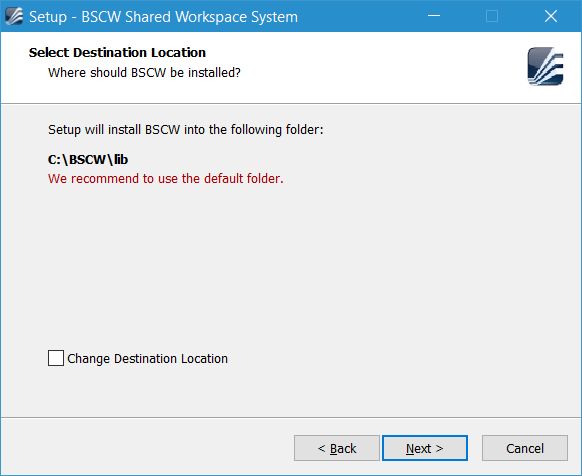
By default BSCW setup will install the BSCW program code in the
C:\BSCW\lib directory. Accept this pre-selection or select a
different directory:
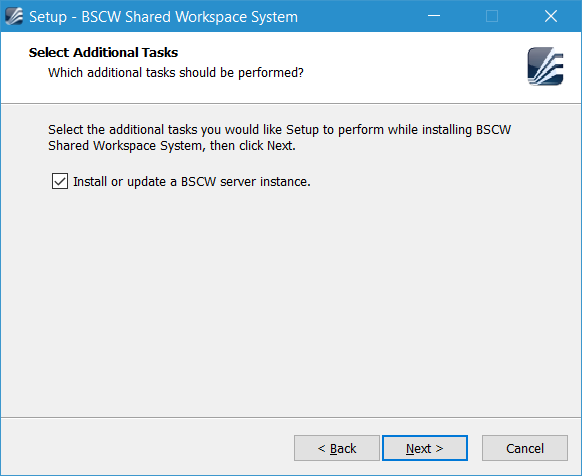
Click and choose as additional task to install or update a BSCW server instance:
Forward with to see a summary of the chosen locations:
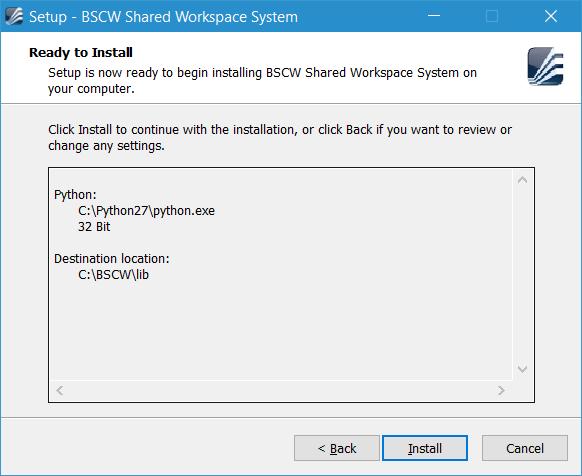
To accept this click which will extract the BSCW 7.4.4 distribution files in the following locations
C:\BSCW\lib\bscw-7.4.4-<rev>-py3?\          # BSCW distribution 7.4.4
C:\BSCW\lib\bscw-7.4.4-<rev>-py3?\bin
C:\BSCW\lib\bscw-7.4.4-<rev>-py3?\bscw      # BSCW executable code
C:\BSCW\lib\bscw-7.4.4-<rev>-py3?\doc       # BSCW documentation
C:\BSCW\lib\bscw-7.4.4-<rev>-py3?\etc
C:\BSCW\lib\bscw-7.4.4-<rev>-py3?\lib       # BSCW third party modules
The BSCW layout allows to install multiple BSCW instances in the
runtime directory (C:\BSCW\srv), which all share the same BSCW
program code located in the library directory (C:\BSCW\lib).
Important
The BSCW distribution must reside in the same partition as all BSCW instances. For instance it is not possible to install the BSCW distribution on drive
C:\and a BSCW instance on another drive (e.g.D:\).Due to Windows access right restrictions is not possible to install a BSCW runtime directory in
C:\Program Files,C:\Program Files (x86)orC:\Windows.
After installing the BSCW distribution files the setup program will run the BSCW instance setup to examine your system, and if a BSCW instance runtime is found the following selection is shown:
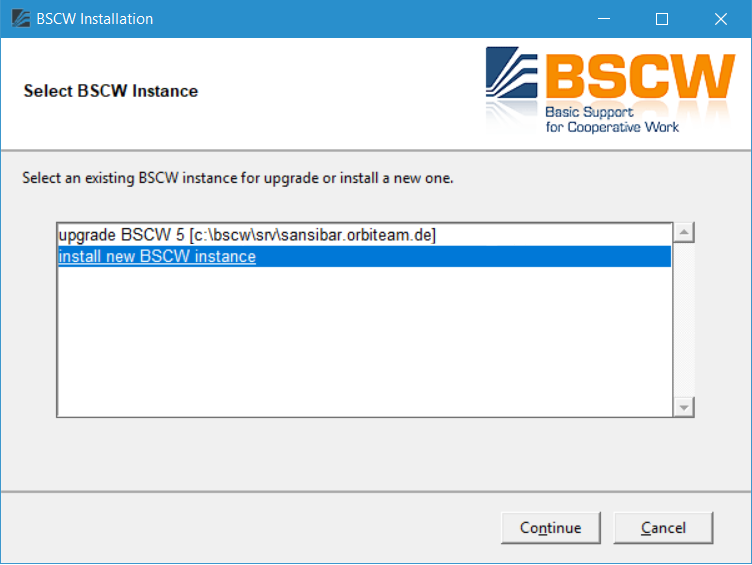
Select “install new BSCW instance” and click . If no BSCW instance runtime is found this step is omitted. Next a console window and a second setup window are opened. To perform an initial instance configuration the following configuration details must be entered:
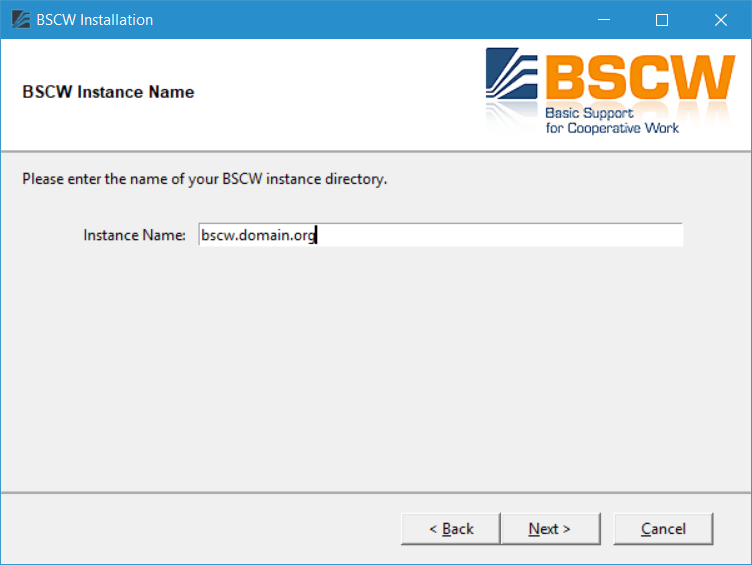
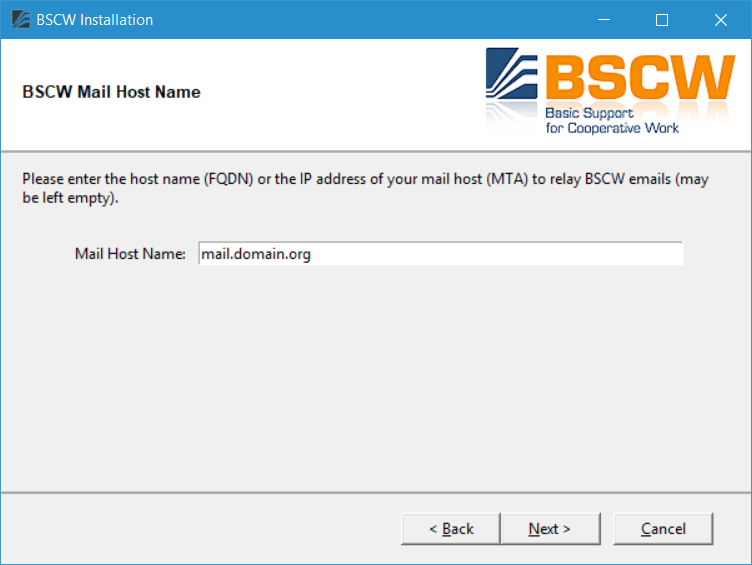
BSCW server root, instance name and mail host name
The server root specifies the visible URL for this instance, while the instance name specifies the directory name of the BSCW instance. Next the mail host name is required by BSCW to relay emails. Please enter the (FQDN) or the IP address of your mail host (MTA). While a working MTA is mandatory for BSCW operation, you may leave the server root definition empty for later configuration.
See also
Section 4.5.1 BSCW Server Root Definition
Note
If you you are using MS Exchange as MTA, you must explicitly allow the IP address of you BSCW server host to relay email.

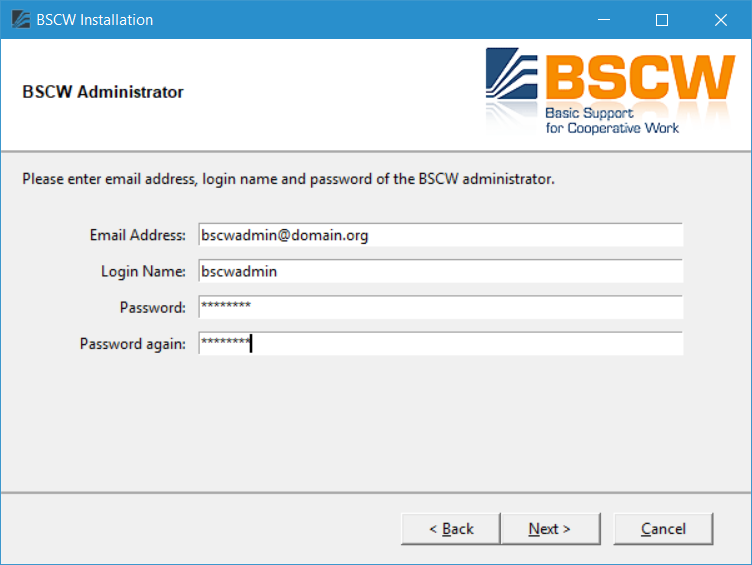
BSCW administrator
Enter a valid BSCW server administrator email address, an user name and a password of the user who shall become a BSCW server administrator
Note
The login name denotes the account of the BSCW administrator and not any Windows account.
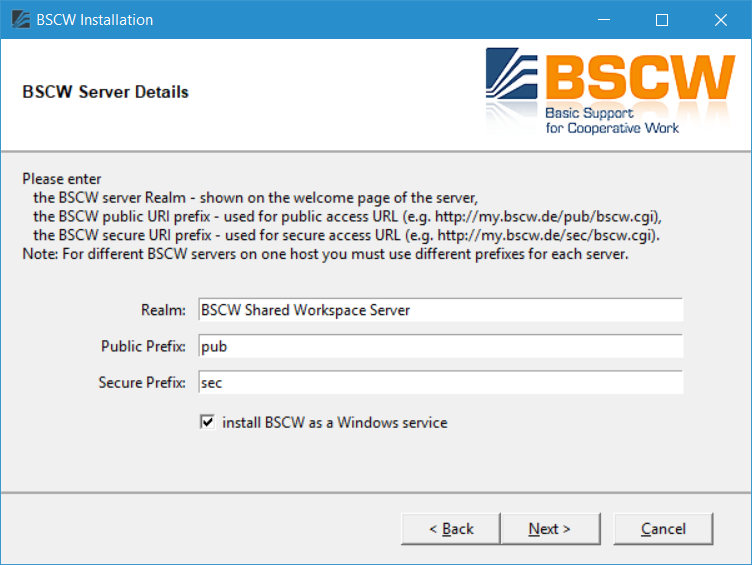
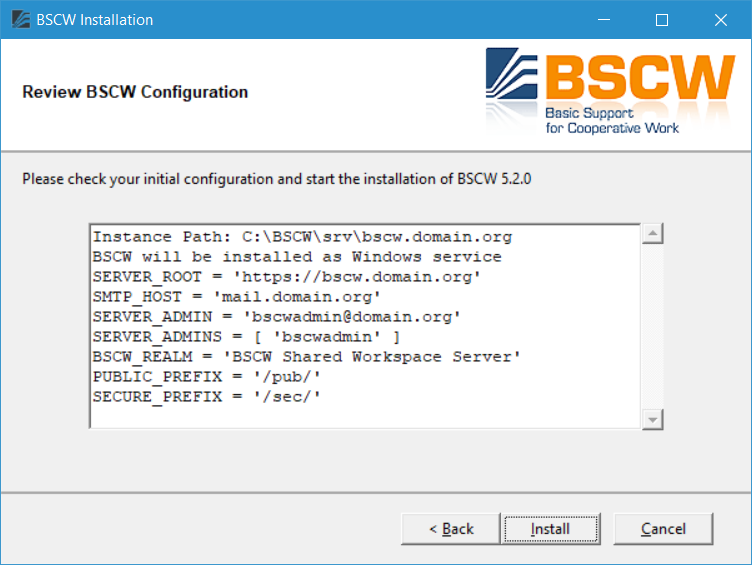
BSCW server details
Finally you have to define the following server detail information. The BCW server realm is shown in authentication dialogs or on the welcome page of the BSCW instance. The BSCW public prefix defines the path after the server root used to allow (unauthenticated) access to published BSCW contents, e.g https://bscw.domain.org/pub/, while the BSCW secure prefix defines the path after the server root used to access personal (authenticated) BSCW contents, e.g https://bscw.domain.org/sec/. It is recommended to install BSCW as a service.
See also
Windows Service for Further Information.
Finally a summary of your settings is shown. You can correct any wrong settings by using the button.
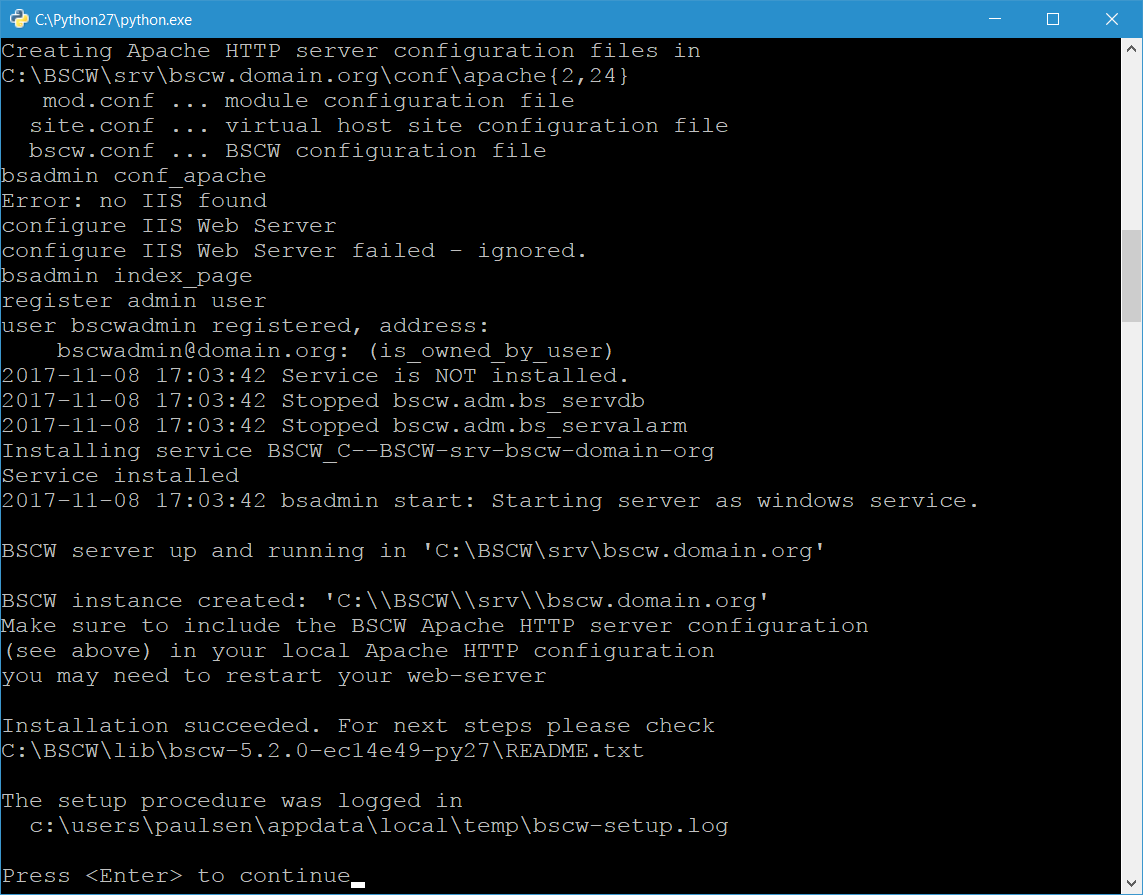
If all settings are correct press the button, which will then start the BSCW instance configuration. The progress is shown in a console window
BSCW refreshes its user interface constantly to reflect changes by other users, even if the current user does not interact with the system. To push changes almost real-time to active users, a WebSocket-based Node.js events server is required.
After the Node.js events server is installed, configure two endpoints
for the events server in the BSCW runtime configuration
<bscw-runtime-path>\conf\config.py:
EVENTS_SERVER_WS = 'ws://127.0.0.1:3836'
EVENTS_SERVER_HTTP = 'http://127.0.0.1:3837'
EVENTS_SERVER_WS defines the WebSocket endpoint meant to accept incoming user connections. It is typically located at localhost nonetheless because the Apache HTTP server is running as a reverse proxy in front of it. EVENTS_SERVER_HTTP is the internal RPC endpoint used by BSCW only, to exchange event and user login data with the events server.
None of these endpoints use SSL. However, for the external user connections, the Apache HTTP will provide encryption, if your BSCW server is set up for HTTPS.
When changing EVENTS_SERVER_WS or EVENTS_SERVER_HTTP settings the BSCW server instance must be restarted.
Depending on the deployed HTTP server, you have to choose one of the following configuration alternatives:
Apache HTTP Server
If you use the Apache HTTP server the setup process automatically generated configuration files in the directory
<bscw-runtime-path>\\conf\\apache24, which contains all necessary configuration instructions.Revise and include the directive
Include
<bscw-runtime-path>/conf/apache24/site.conf
into the filehttpd.conf. Please note it will most likely not work out of the box, but you have to adapt it to your local Apache HTTP server configuration. Especially you will need to install certificates for your SSL enabled server and adapt the configuration insite.conf.After editing
<bscw-runtime-path>\conf\config.pyenable the Apache modules proxy, proxy_http and proxy_wstunnel. Next run bsadmin conf_apache to set up the reverse proxy configuration and restart the Apache server.Attention
Before including the
bscw.conffile ensure all required Apache HTTP modules are loaded, see Section 4.5.2 Apache HTTP Server Configuration for a more complete Apache HTTP server configuration discussion.Microsoft Internet Information Server (IIS)
If you use the Microsoft Internet Information Server (IIS) all necessary IIS configuration for BSCW is done by the setup script automatically for Windows 10, Server 2016/2019. Finally the setup script launches your default Web browser to connect to your BSCW server.
Be sure to enable WebSocket support. For further details see Section 4.5.3 IIS Configuration.
Note
It is recommended to use the Apache HTTP 2.4 server on Windows; when using the Microsoft IIS the WebDAV (“web folders”) functionality of BSCW will not be available.
When using the Microsoft Internet Information Server (IIS) CGI support must be enabled manually before the BSCW installer is started, otherwise the automatic configuration of IIS may fail.
After your BSCW instance is running you can log in with the administrator account registered during the installation procedure (see above) by opening the URL (mind login name and password are case sensitive!):
http://<server>[:port]/sec/bscw.cgi
(e.g.http://bscw.domain.org/sec/bscw.cgi)
Actually to gain administrator rights you have to login a second time with your password by opening . If you open the URL
http://<server>[:port]/pub/
(e.g. http://bscw.domain.org/pub/)
you get a BSCW overview which contains links to your BSCW instance.
4.3. Software for BSCW Preview
The BSCW preview component displays thumbnail images for uploaded documents. If the user moves the mouse pointer over an BSCW object icon in the type column, an image of the first page of an document is shown.
To enable the BSCW preview component the following additional software must be available on the hosting system:
Java Runtime Environment
HTML/PDF converters: WeasyPrint (preferred) or PhantomJS
Ghostscript
GraphicsMagick
LibreOffice
Text/HTML converters: markdown2, html2text
Image converter: PIL
Metadata extraction: Tika-Server (optional)
In particular install this software components as follows:
Java Runtime Environment 8 or 11 (http://www.oracle.com/technetwork/java)
Java platform independent programming language
The Java Runtime Environment (JRE) must be separately installed. Download the JRE from:
http://www.oracle.com/technetwork/java/javase/downloads/index.html
Ensure the
binandbin\clientdirectories of the JRE are listed in the Windows system “Path” environment variable, e.g. add:C:\Program Files (x86)\Java\jre1.8.0_???\bin; C:\Program Files (x86)\Java\jre1.8.0_???\bin\clientAttention
After upgrading your Java Runtime Environment (JRE) to a new release the new installation path must be adapted manually in the Windows system “Path” environment variable. Afterwards a system restart is required.
HTML/PDF converters
Install one of the following HTML/PDF converters. WeasyPrint gives better results and is therefore preferred, while PhantomJS is easier to install.
2.1 WeasyPrint (https://weasyprint.readthedocs.io)
WeasyPrint requires Python 3 and is relatively costly to install on Windows.
For a detailed installation instruction see: https://weasyprint.readthedocs.io/en/latest/install.html#windows
Update the Windows system
Pathenvironment variable accordingly.2.2 PhantomJS 2.1 (http://phantomjs.org/)
PhantomJS is a headless WebKit scriptable with a JavaScript API and can be downloaded from:
http://phantomjs.org/download.html
A binary is available at:
https://bitbucket.org/ariya/phantomjs/downloads/phantomjs-2.1.1-windows.zipCopy the static binary bin\phantomjs.exe to a suitable location, e.g. to
C:\Program Files
(x86)\PhantomJS\bin\phantomjs.exe
and addC:\Program Files (x86)\PhantomJS\binto the Windows systemPathenvironment variable.
Ghostscript 9 (http://ghostscript.com)
Ghostscript is an interpreter for the PostScript language and for PDF
The Ghostscript interpreter installer can be downloaded from:
https://github.com/ArtifexSoftware/ghostpdl-downloads/releases/download/gs952/gs952w64.exe
and the standard Ghostscript fonts (
ghostscript-fonts-std-8.11.tar.gz) from:https://sourceforge.net/projects/gs-fonts/
Execute the installer gs952w64.exe which installs Ghostscript to the default location
C:\Program
Files\gs\gs9.52
. After successful installation add theC:\Program Files\gs\gs9.52\binpath to the Windows systemPathenvironment variable.Next extract the Ghostscript fonts directly into the
C:\Program Files\gs\gs9.52\libdirectory.Attention
include the font files directly in the
libdirectory and not inside afontssub directory!
GraphicsMagick (http://www.graphicsmagick.org)
GraphicsMagick is a library for image processing
The GraphicsMagick installer can be downloaded from:
ftp://ftp.graphicsmagick.org/pub/GraphicsMagick/windows/GraphicsMagick-1.3.33-Q16-win64-dll.exe
Execute the installer GraphicsMagick-1.3.33-Q16-win64-dll.exe which installs GraphicsMagick to the default location
C:\Program
Files\GraphicsMagick-1.3.33-Q16
. After successful installation add theC:\Program Files\GraphicsMagick-1.3.33-Q16path to the Windows systemPathenvironment variable (This could be automatically achieved by selecting “Update executable search path” from within the installer).After installation check if GraphicsMagick correctly finds Ghostscript:
> gm convert -list Delegates
...
  ps<=>pdf    "C:\Program Files\gs\gs9.52\bin\gswin64c.exe" -q -dBATCH
              -dSAFER -dMaxBitmap=300000000 -dNOPAUSE -sDEVICE=pdfwrite
              -sOutputFile=%o -- "%i" -c quit
Note
GraphicsMagick requires the installation of the Microsoft Visual C++ 2008 Redistributable Package (x64).
GraphicsMagick and Ghostscript must be installed for the same architecture. Mixing 32-bit and 64-bit installations of GraphicsMagick and Ghostscript might cause problems.
LibreOffice (https://www.libreoffice.org/)
LibreOffice is a open source office suite
Note
At least LibreOffice version 5 is required, best use the current release LibreOffice 7.1
The “LibreOffice” installer can be downloaded from:
https://www.libreoffice.org/download/download/
Text/HTML converter
Install
markdown2andhtml2textas followsmarkdown2 converts text to HTML using the markdown markup
Use pip3 to download and install
markdown2:> pip3 install markdown2
html2text converts HTML to text using the markdown markup
Use pip3 to download and install
html2text:> pip3 install html2text
Image converter
For image conversion the Python Imaging Library is required
Use the Python package manager pip3 to download and install:
> pip3 install Pillow
Apache Tika
BSCW utilizes the Apache Tika toolkit (https://tika.apache.org) to extract metadata and text from uploaded documents. To enable the Apache Tika a Java Runtime Environment 8 must be available on the server host.
To accelerate metadata extraction it is possible to install an optional standalone tika-server. For installation download the tika-server JAR archive from
and copy it into the BSCW distribution
> cd C:BSCWlibbscw-7.4.4-<rev>-py3?
> copy tika-server-1.??.jar bscwlibexectika
Additionally the
tikaPython package is required, use pip3 to download and installtika> pip3 install tika
If the prerequisites 1-7 are met run
bsadmin update_defaults to generate a new BSCW converter configuration (
<bscw-runtime-path>\conf\config_convert.py). Use the verbose option (-v) to check if BSCW found the required converter programs to create the previews files:> cd C:\BSCW\srv\<bscw> > bin\bsadmin update_defaults -v ... Converter auto-configuration: Found Commands: 'gm': 'c:\\program files\\graphicsmagick-1.3.??-q16\\gm.exe' 'java': 'c:\\program files (x86)\\java\\jre1.8.0_???\\bin\\java.exe' 'phantomjs': 'c:\\program files (x86)\\phantomjs\\bin\\phantomjs.exe' 'unoconv': '"%(py)s" "%(cnv)s\\unoconv\\unoconv"' ... config_convert.py updated
Optionally you may create for all existing documents the required preview files using the bsadmin preview command:
> bin\bsadmin preview
Usage:
 bsadmin preview list
 bsadmin preview create [-v|-q] [-f|-ff]  [<oid0> ... <oidn>]
 bsadmin preview delete [-v|-q]           [<oid0> ... <oidn>]
 bsadmin preview [-h]

    Generate Document preview documents

 positional arguments:
    list      print preview states and preview document file names
    create    created preview for documents in 'var/cache/preview'
    delete    deletes preview states and generated preview documents

 optional arguments:
    -f        force upgrade of all previews
    -ff       force upgrade of previews with state 'FAILURE'
    -v        verbose
    -q        quiet
    -h        show this help message and exit
Note
On large BSCW installations bsadmin preview create may take a very long period (weeks!)
The execution of bsadmin preview create is not mandatory, because preview files are automatically scheduled for background creation the first time an existing folder is read by an user.
In the case of problems with automatic preview file generation enable
logging by adding the following entry to BSCW_LOGGING in <bscw-runtime-path>\conf\config.py. The
BSCW preview component will then log into
<bscw-runtime-path>\var\log\prev.log:
BSCW_LOGGING = {
    'sys': ('WARN', 'sys.log'),
    'prev': ('DEBUG', 'prev.log'),
    # ...
}
An preview log file entry:
2018-02-10 11:35:07 prev DEBUG pid 123 error: libexec/conv: Document#456
    ...gm convert: Unable to get type metrics...
indicates that the ghostscript standard fonts are missing resp. are not properly installed.
Note
To disable the BSCW preview feature add an entry CREATE_PREVIEWS
in <bscw-runtime-path>/conf/config.py:
CREATE_PREVIEWS = False
4.4. Database Server and Garbage Collection
All data of the BSCW server is held in the BSCW data store and handled
through the BSCW database server. The BSCW database server is managed
with the bsadmin script, which is located in the BSCW instance
directory <bscw-runtime-path>\bin. The BSCW server can be
administered by executing the bsadmin script from a DOS shell as
follows
> cd <bscw-runtime-path>
> bin\bsadmin startStarts the BSCW server. If it is registered as a Windows service, the service is run, otherwise the server is started directly. To avoid calling bsadmin start manually, you can set up the windows service to start up at system boot or use the task scheduler instead (see below).
Note
Controlling Windows services requires administrative privileges.
> bin\bsadmin stopStops the BSCW server. If it is registered as a Windows service, the service is stopped, otherwise the server is stopped directly.
Note: Controlling Windows services requires administrative privileges.
> bin\bsadmin garbageRuns the garbage collection on the BSCW database. Note: the garbage collection requires the BSCW server to run!
> bin\bsadminLists further administration functions.
We recommend that bsadmin start should be executed at system boot. To achieve this you have to register BSCW as Windows service. Furthermore for the garbage collection a task job must be set up, which calls these functions periodically (see below).
The BSCW database garbage collection must be run daily. The task of the garbage collector is to find unreferenced, e.g., obsolete objects in the data store and remove them. For performance reasons, a delete operation on an object may not remove the respective object physically from the store. If you do not run the garbage collector periodically, the BSCW data store will grow constantly although many of its objects are obsolete. This would waste disk space and may substantially reduce the performance of the BSCW server.
4.4.1. Windows Service
On Windows 10, Server 2016/2019 the BSCW server can be run as a Windows service. This is an optional, convenient way to launch it in the background without showing a DOS shell.
The BSCW installer offers to register a Windows service, starting up at boot time. If you have chosen to do this, you can use bsadmin start and bsadmin stop to start/stop the service assuming you are working with administrative privileges.
Additionally you may register resp. removed the Windows service later by executing the bsadmin script from a DOS shell as follows
> cd <bscw-runtime-path>
> bin\bsadmin serviceDisplays usage hints.
> bin\bsadmin service installRegisters the BSCW Windows service (manual startup).
> bin\bsadmin service --startup auto installRegisters the BSCW Windows service (startup at boot time).
> bin\bsadmin service removeRemoves the BSCW Windows service.
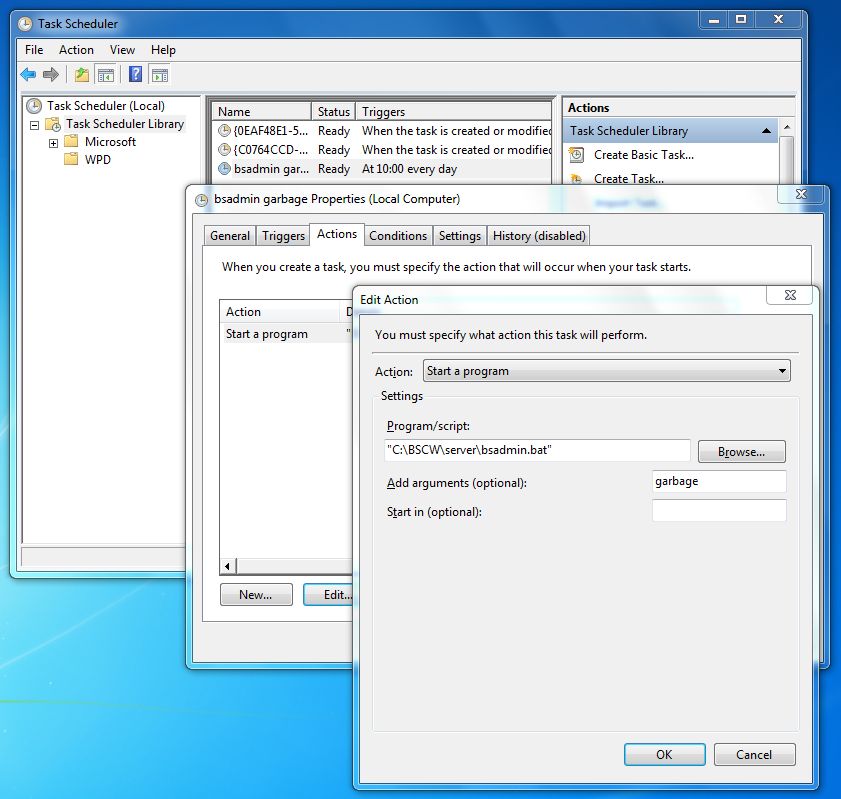
4.4.2. Task Scheduler
On Windows 10, Server 2016/2019 use the task scheduler to schedule periodic system commands (such as the garbage collection).
At least you have to schedule one job to run the BSCW garbage collector (e.g. once per night). Use the following command line to run the garbage collection:
"<bscw-runtime-path>\bin\bsadmin.bat" garbage
If you do not want to run the BSCW server as a Windows service, you may alternatively use the task scheduler to start it. Use the following command line to define a scheduled job to start BSCW at system boot:
"<bscw-runtime-path>\bin\bsadmin.bat" start
Note
You may use the command above without quotes if the path names does not contain any spaces.
Important
The task scheduler requires bsadmin.bat.
Do not run the same BSCW server instance more than once! This may seriously damage the BSCW database.
4.5. Further Configuration Details
All BSCW configuration parameters are stored (similar to the Unix version) in configuration files.
See also
Chapter 5 Configuration of BSCW Servers
These configuration files will be updated during the installation and can be changed by a BSCW administrator on the page within the item “BSCW Server Settings” or by directly editing the respective configuration files (see below for further details).
The standard set up should create an installation which should be appropriate in most cases. However, if you want to modify the default settings, you will find respective information in this section. Please note in this section only Windows 10, Server 2016/2019 specific configuration options are explained:
BSCW server root definition
Apache HTTP server configuration
IIS configuration
BSCW registry settings
De-Installation
4.5.1. BSCW Server Root Definition
The server root - the hostname (and port) part of your BSCW servers
URL - is specified in the BSCW server instance configuration file at
<bscw-runtime-path>\conf\config.py. The variable
SERVER_ROOT contains the absolute URL of your BSCW
server and an optional port. If no port is specified the standard ports
80 (for HTTP) or 443 (for HTTPS) are assumed:
SERVER_ROOT = 'http://bscw.domain.org/'
SERVER_ROOT = 'http://bscw.domain.org:123/'
SERVER_ROOT = 'http://bscw.domain.org/'
A fully qualified host name is required as server name
bscw.domain.org, in order to allow the BSCW server to resolve its
name to an IP address (SERVER_ROOT may not
contain an IP address anymore!).
Ideally you define a host name/nickname A/CNAME in your DNS zone,
which points to your BSCW server host, e.g.:
server1.domain.org    A         1.2.3.4
server2.domain.org    A         1.2.3.5
bscw.domain.org       CNAME     server1.domain.org
Proceeding this way a future migration of your BSCW server from
server1 to server2 will keep the well known URL
http://bscw.domain.org and your license will not be invalidated by
the migration.
Note
Whenever the SERVER_ROOT is changed in the
instance configuration file
<bscw-runtime-path>\src\config.py you must call
bsadmin update_helper in order to update the jnlp
deployment files with the correct codebase URL. Otherwise users may
not be able to launch or install the BSCW Desktop application
anymore.
4.5.2. Apache HTTP Server Configuration
Download e.g from http://www.apachehaus.com/ or http://www.apachelounge.com/ and install an Apache HTTP server binary on your Windows host by following the instructions for your Apache HTTP server binary distribution.
Note
After installing the Apache HTTP server it might be necessary to add an incoming firewall rule to your Windows Firewall for port 80 or 443.
BSCW requires in addition to a (virtual) web server for user access, a
second (virtual) web server running on localhost (127.0.0.1).
This second (virtual) web server enables BSCW services (e.g. the
User Notification Services (UNO) of section 7.4.1 or the alarm (ALARM) service) to access
the BSCW database server via HTTP using the following URL:
http://localhost/pub/bscw.cgi
Note
The port, the script alias path and the script name may be changed
by altering the configuration directives HTTP_LOCAL_PORT, SCRIPTS and
CREATE_SCRIPTS in the instance configuration
file <bscw-runtime-path>\conf\config.py.
The localhost port to the HTTP server defined in
HTTP_LOCAL_PORT must support HTTP;
HTTPS is not supported!
The BSCW setup process automatically generates the following Apache HTTP server configuration files
<bscw-runtime-path>/conf/apache24/mod.conf
<bscw-runtime-path>/conf/apache24/site.conf
<bscw-runtime-path>/conf/apache24/bscw.conf
which contain all necessary configuration instructions.
The mod.conf file ensures the loading of additional modules required
by BSCW and must be included in the main Apache HTTP server
configuration file httpd.conf. Instead including this file you could
enable the loading of the required modules
cgid_module(orcgi_module)
expires_module
deflate_module
headers_module
rewrite_module
ssl_module
proxy_module
proxy_http_module
proxy_wstunnel_module
using your platform specific Apache layout.
The site.conf file contains several virtual host containers.
Depending on your SERVER_ROOT definition in the
instance configuration file <bscw-runtime-path>\conf\config.py
the site.conf file defines the following virtual hosts:
if a HTTP server root is defined (e.g. the SERVER_ROOT directive starts with
http://...) thesite.conffile defines two virtual host containers: a first virtual host container forlocalhost:80required by internal BSCW services and a second virtual host container for the server root host name<hostname>:80for requests.if a HTTPS server root is defined (e.g. the SERVER_ROOT directive starts with
https://...) thesite.conffile defines three virtual host containers: a first virtual host container forlocalhost:80required by internal BSCW services, a second virtual host container for the server root host name<hostname>:80which redirects all requests to the third virtual host container<hostname>:443for SSL requests.
Both files include the bscw.conf file with the actual BSCW instance
configuration. If you intend to use the site.conf file copy it to
your Apache HTTP server configuration. Please note it will most likely
not work out of the box, but you have to adapt it to your local Apache
HTTP server configuration. Especially you will need to install
certificates for your SSL enabled server and adapt the configuration in
site.conf.
Note
When using the BSCW site.conf file you should not
include the httpd-vhosts.conf file which is included in the
main configuration httpd.conf by default:
# Virtual hosts
#Include conf/extra/httpd-vhosts.conf
The bscw.conf file contains the actual BSCW instance configuration
for the Apache HTTP server. It may be included in the main configuration
file httpd-vhosts.conf resp. httpd-ssl.conf if you manually
define virtual hosts (within the standard Apache HTTP server layout) or
in httpd.conf without defining virtual hosts:
Include <bscw-runtime-path>/conf/apache24/bscw.conf
When using virtual web server container (<VirtualHost> ...
</VirtualHost>) directives, it is possible to include the
<bscw-runtime-path>\conf\apache24\bscw.conf configuration
file in multiple virtual web server containers. An example for a virtual
web server definition in the Apache HTTP server configuration file
should look as follows:
<VirtualHost 127.0.0.1:80>
    ServerName  bscw.domain.org
    ServerAlias localhost
    ServerAdmin hostmaster@domain.org

    ErrorLog        logs/bscw_domain_org_error_log
    CustomLog       logs/bscw_domain_org_access_log common
    ScriptLog       logs/bscw_domain_org_error_log

    DocumentRoot "<bscw-path>/var/www"
    <Directory "<bscw-path>/var/www">
        options                     ExecCGI FollowSymLinks MultiViews
        AllowOverride               None
        DirectoryIndex              index.html default.htm
        LanguagePriority            en de es fr
        AddType                     text/html en de es fr
        ForceLanguagePriority       Fallback
        Require                     all granted
    </Directory>

    Include "<bscw-runtime-path>/conf/apache24/bscw.conf"
</VirtualHost>

<VirtualHost bscw.domain.org:80>
    ServerName  bscw.domain.org
    ServerAdmin hostmaster@domain.org

    ErrorLog        logs/bscw_domain_org_error_log
    CustomLog       logs/bscw_domain_org_access_log common
    ScriptLog       logs/bscw_domain_org_error_log

    <IfModule headers_module>
        Header set Content-Security-Policy "frame-ancestors 'self';"
   </IfModule>

    DocumentRoot "<bscw-path>/var/www"
    <Directory "<bscw-path>/var/www">
        Options                     ExecCGI FollowSymLinks MultiViews
        AllowOverride               None
        DirectoryIndex              index.html default.htm
        LanguagePriority            en de es fr
        AddType                     text/html en de es fr
        ForceLanguagePriority       Fallback
        Require                     all granted
    </Directory>

    Include        "<bscw-runtime-path>/conf/apache24/bscw.conf"
</VirtualHost>
To provide a SSL encrypted web site your virtual web server definition
should look like (Note: additionally you will still require a HTTP web
server on localhost as defined above).
<VirtualHost bscw.domain.org:80>

    ServerName  bscw.domain.org
    ServerAdmin hostmaster@domain.org

    ErrorLog    logs/bscw_domain_org_error.log
    CustomLog   logs/bscw_domain_org_access_log common
    ScriptLog   logs/bscw_domain_org_script.log

    <IfModule alias_module>
        RedirectMatch permanent ^/(.*)$ https://bscw.domain.org/$1
    </IfModule>
</VirtualHost>

<VirtualHost bscw.domain.org:443>
    ServerName  bscw.domain.org
    ServerAdmin hostmaster@domain.org

    ErrorLog    logs/bscw_domain_org_error.log
    CustomLog   logs/bscw_domain_org_access_log common
    ScriptLog   logs/bscw_domain_org_script.log

    <IfModule headers_module>
        Header set Strict-Transport-Security: "max-age=31536000; includeSubDomains"
        Header set Content-Security-Policy "frame-ancestors 'self';"
    </IfModule>

    DocumentRoot "<bscw-runtime-path>/var/www"
    <Directory "<bscw-runtime-path>/var/www">
        Options                     ExecCGI FollowSymLinks MultiViews
        AllowOverride               None
        DirectoryIndex              index.html default.htm
        LanguagePriority            en de es fr
        AddType                     text/html en de es fr
        ForceLanguagePriority       Fallback
        Require                     all granted
    </Directory>

    SSLEngine on
    SSLVerifyDepth 5

    #SSLCACertificateFile           conf/ssl/ca-bundle.crt
    #SSLCertificateChainFile        conf/ssl/bscw_domain_org_root.crt
    SSLCertificateKeyFile           conf/ssl/bscw_domain_org.key
    SSLCertificateFile              conf/ssl/bscw_domain_org.crt

    Include        "<bscw-runtime-path>/conf/apache24/bscw.conf"
</VirtualHost>
You may change the BSCW Apache HTTP server configuration file by using the bsadmin conf_apache script. To adapt the generated Apache configuration file to your local web server settings use one of the following options:
If no option is used bsadmin conf_apache tries to read the old option setting from
bscw.conf(if exists). Use option -n or removebscw.confif you want to avoid this.If option -r is used (requires
rewritemodule) the user credentials are passed that the authentication is handled by the BSCW server (this is the default case).If option -a is used, BSCW allows to let the Apache HTTP server perform authentication.
If option -s is used the Apache HTTP server is configured for authentication via client certificates. This option includes the -r option and requires a SSL enabled server.
If option -o is used client certificates authentication optional. This option includes the -r option and requires a SSL enabled server.
If option -H is used, the HTTP/2 protocol is enabled (which additionally requires the
http2module).Option -S enables the following HTTP security headers: X-Content-Type-Options, Referrer-Policy, Content-Security-Policy, Strict-Transport-Security. Please make sure to apply these changes from
conf/apache24/site.confto your current configuration.If the -D or -E options are used the Apache HTTP server is configured to compress (gzip) BSCW resources (-D) or to cache resources due to a long time future expiry date (-E). These options require the
deflate(-D) or theexpires(-E) modules (these options are enabled by default).Using -d (instead of -D) also enables compression for BSCW responses.
Warning
Compression and TLS encrypted connections may allow an information disclosure attack (for more information search for “breach” attacks).
Note
If you are running several BSCW instances in different virtual hosts you must configure for each BSCW instance a different HTTP_LOCAL_PORT number and you must extend the
VirtualHostdirectives by these local IP addresses/port pairs.It might be necessary to add an extra
Listen
127.0.0.1:<HTTP_LOCAL_PORT>
directive to the Apache HTTP server configuration filehttpd.conf.
Remember to always restart your Apache HTTP server whenever the bsadmin conf_apache script was run.
4.5.3. IIS Configuration
WebSocket support must be manually enabled for BSCW 7 as follows:
In , activate .
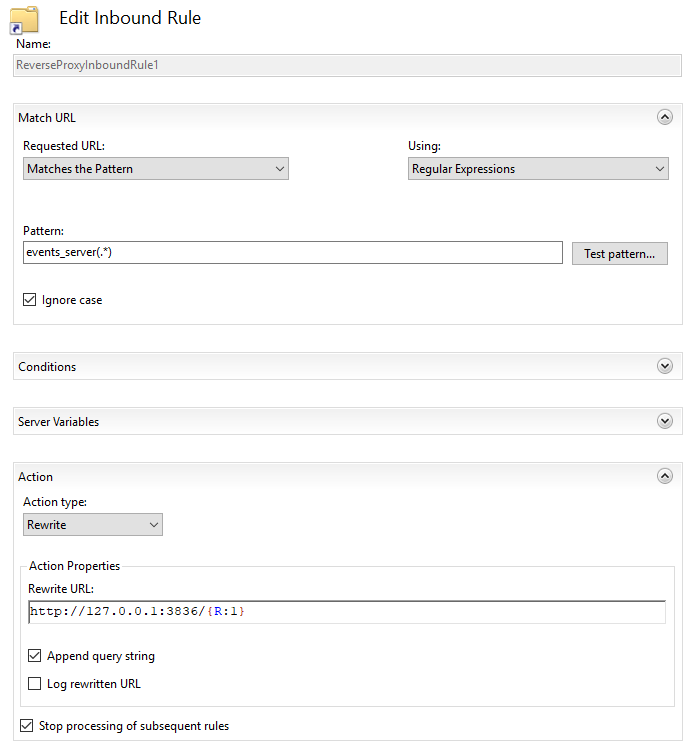
Next, install ARR from https://www.iis.net/downloads/microsoft/application-request-routing and restart IIS.
Finally, in , browse to your BSCW servers’ site using the left-hand tree, select your configured pub URL prefix and double-click on the right side. Click , and create/edit a new rule that in the end looks like this:
The BSCW server requires additional virtual directory mappings of your Web server. They depend on the values specified for the SCRIPTS dictionary in the BSCW server configuration. By default the virtual directory mappings are
/sec           C:\BSCW\srv\<runtime>\var\www
/pub           C:\BSCW\srv\<runtime>\var\www
These directory mappings are set and configured automatically for IIS by BSCW on Windows 10, Server 2016/2019 using the installation program bsadmin conf_iis.
Note
Before running bsadmin conf_iis you have to manually activate the CGI support for your IIS.
IIS 8/9/10 installation
If the Internet Information Services 8/9/10 are not installed on Windows Server 2016/2019 follow these instructions to install IIS:
(Windows Server 2016/2019) open the Server Manager Dashboard, open and follow the wizard:
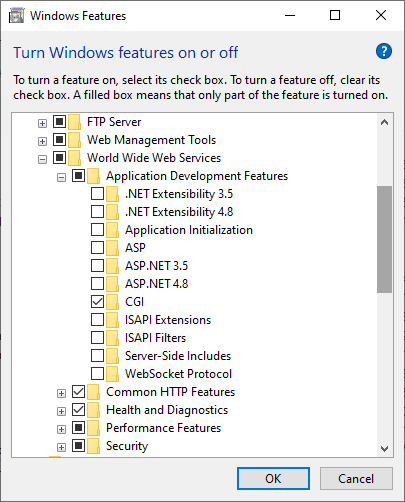
[Before you login]

[Installation type]

  [x] Role-based or feature based installation

[Server Selection]

  [x] select a server from the server pool

  [<this server>]

[Server Roles]

  [x] Web Server (IIS)

[Web Server Role]

  [Role Services]

    [x] CGI

[Confirmation]

[Install]
Manual IIS 8/9/10 configuration
Complete the installation steps of the wizard to install IIS. After installation configure IIS as follows:
select
add new virtual directories
select in the context menu of the
add the following directory mappings:
pub    -> <bscw-runtime-path>\var\www
sec    -> <bscw-runtime-path>\var\www
configure virtual directories
open the virtual directory for
pubresp.bscwand choose for each directoryadd in [Handler Mappings] a script mapping with [Add Script Map…]:
Request Path:   .cgi
Executable:     "<python-path>\python.exe" -u "%s"
Name:           Python Script
open and deselect [Invoke handler only if request is mapped to]
confirm pop up windows of each [Add Script Map] question with OK.
BSCW uses its own built-in authentication scheme to check the access for
the virtual directory bscw. Therefore no authentication filter is
necessary. These configurations will be done for Windows 10, Server
2016/2019 by the BSCW administration command bsadmin
conf_iis.
Note
On Windows Server 2016 only “Desktop Experience” installations are supported.
Hint: If your path <python-path> contains space characters
alternatively you can use the Windows short filename (SFN or “8.3
filename”) to the python.exe executable.
4.5.4. De-Installation
The BSCW de-installation procedure only allows to remove BSCW libraries which are no longer in use by any installed BSCW instance. To de-install old BSCW libraries, start the BSCW de-installer program in the systems control panel.
4.6. Folder Mail Delivery
BSCW does not support BSCW folder mail delivery on Windows.